NanoVNA-QT
NanoVNA-QT (also known as VNA View) is the native PC software for the NanoVNA series developed directly by NanoRFE. It supports adjustable sweep points and firmware updates, and offers the most stable performance and highest data throughput. It is the recommended choice for users who require laboratory-grade stability and full feature support for the latest VNA6000 and V2 Plus4 models.
You may use the "mock device" feature (located under the Device menu) to test-drive the software prior to purchasing a VNA.
Features:
- Visualizations: Smith chart, LogMag, Phase, Impedance, and VSWR plots.
- Real-time: Live measurement and continuous display updates.
- Custom Calibration: Full support for custom calibration kit parameters.
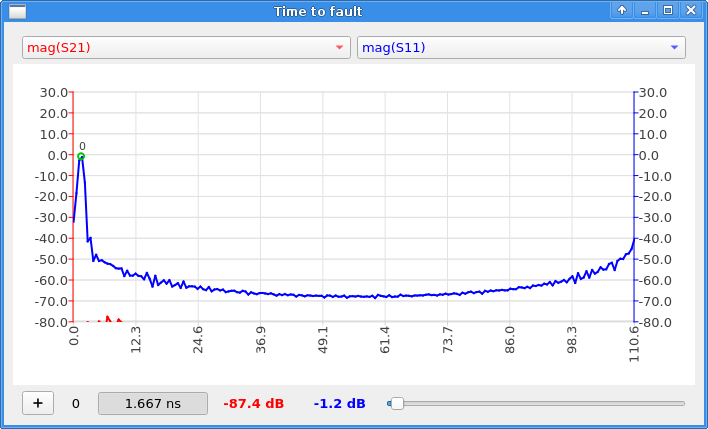
- TDR Analysis: Specialized "Distance to Fault" and time-domain views.
- Port Extension: Allows correcting for cable length/phase shift after calibration.
- Developer API: C/C++ API for raw S-parameter data access and automation.
- Export Options: 1-port/2-port S-parameter (Touchstone) and CSV file export.
- Data Logging: Automated, continuous data export for stability monitoring.
- Compatibility: Supports all NanoRFE NanoVNA hardware versions.
Screenshots:
Download NanoVNA-QT v1.1 (Latest)
Older versions
Using NanoVNA-QT
NanoVNA-QT offers highly optimized sweep rates, raw data extraction, and a robust interface. Below is a quick start guide to making your first measurements.
1. Connecting to Your Device
After connecting your NanoVNA to your PC via USB, it will appear as a virtual serial port.
- Open NanoVNA-QT and click on the Device menu at the top.
- Select your device from the drop-down list (e.g.,
COM3on Windows or/dev/ttyACM0on Linux/Mac). - If you get an error, you may need to go to Device > Other and manually enter
\\.\COMx(where x is your port number). - A continuous sweep will start immediately, and you will see actively updating data on the Smith chart and line plots.
Note: Windows 10/11, macOS, and Linux natively support the USB CDC class. If your device doesn't show up on older Windows OS versions, you may need to install the Cypress USB Serial driver.
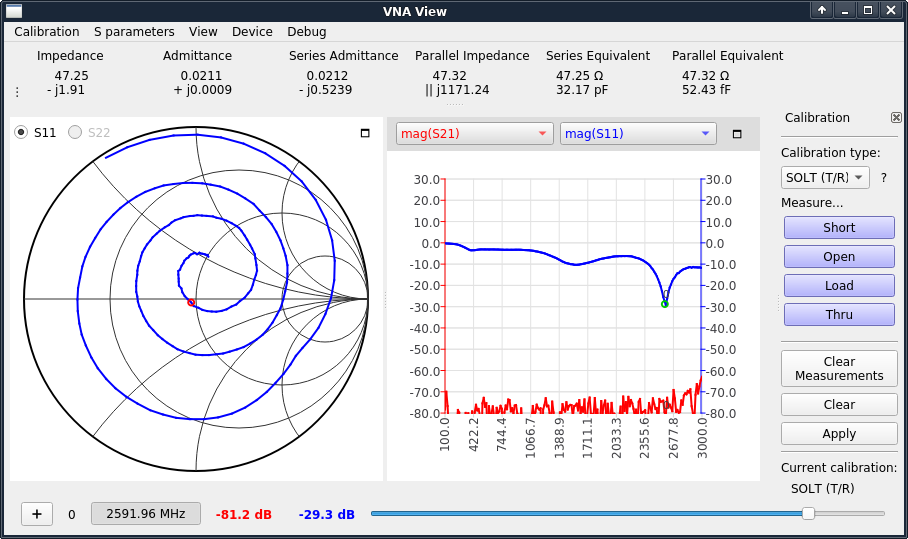
2. Navigating the User Interface
- Smith Chart Display: Shows a Smith chart of S11 or S22 depending on your selected radio button.
- Line Graph Display: Displays a plot of two user-selected traces. Use the drop-down menus above the graph to select your data source (the trace color matches the drop-down color).
- Calibration Pane: Found on the right side, this pane allows you to measure calibration standards and toggle error correction.
- Impedance Display: Shows exact impedance values and series/parallel equivalent circuits calculated from S11.
- Markers: Click the "+" button to add a new marker. Adjust the slider to move the marker along the sweep. Labels will show the exact numeric value at the current frequency.
3. Setting Sweep Range & Parameters
Before calibrating or measuring, you must define your frequency range.
- Go to Device > Sweep parameters... in the main menu.
- Set your Start frequency and Stop frequency.
- Set Frequency points (the number of discrete points you wish to sweep).
- Under Advanced Settings, you can adjust nValues. This controls the number of data points per sweep point to average over. A higher averaging factor reduces noise but increases sweep time.
Note: For the NanoVNA series, "Output power" and "nWait" settings in this menu are not applicable and are ignored by the hardware.
4. Performing a Calibration
Calibration must be performed whenever the frequency range is changed. Changing the sweep range automatically clears the active calibration.
- Reset the current state by clicking Clear and Clear Measurements in the Calibration pane.
- Select your Calibration type: Choose SOL (1-port) to correct for S11 only, or SOLT (T/R) for S11 and S21 response.
- Attach an SMA cable to Port 1 (and Port 2 if using SOLT).
- Connect the OPEN standard to the Port 1 cable and click the Open button. The software will perform a full sweep. Wait for the button to highlight.
- Repeat this process for the SHORT and LOAD standards on Port 1.
- (SOLT only) Connect the THRU standard between the Port 1 and Port 2 cables, and click Thru.
- Click Apply.
To save this calibration for future use, click Calibration > Save as... in the main menu. You can recall it later via Calibration > Load....
5. Firmware Updates via NanoVNA-QT
NanoVNA-QT includes built-in support for flashing new firmware binaries directly to your device.
- Put your device into BOOTLOAD mode. (On the device menu navigate to: CONFIG → BOOTLOAD → RESET AND ENTER, or hold the JOG LEFT button while powering the device on).
- Connect the device via USB and select it under the Device menu in NanoVNA-QT.
- The software will detect bootload mode and prompt you to update. Click "Yes" or "Update firmware".
- Select the raw binary (
.bin) firmware file you downloaded from the NanoRFE firmware page. - Once the progress bar completes, the device will automatically reboot into the new firmware and is ready for use.
Need more details? For an in-depth breakdown of custom calibration kit settings and USB data interface protocols, please refer to the full NanoVNA V2 User Manual.