NanoVNA Software & Drivers
This page lists all NanoVNA software and driver downloads.
Expand the capabilities of your NanoVNA by connecting it to your PC, Mac, or Linux machine. The software below enables high-resolution analytical sweeps, data logging, and Touchstone (.s1p, .s2p) export. Download the latest verified releases of NanoVNA-QT, NanoVNA Saver, and their required drivers below.
As of 2026, there are many underperforming clones on the market. Genuine V2/3GHz NanoVNA units use costly, high-quality components (like ADF4350 and AD8342), whereas clones cut costs by using salvaged parts that cause software communication dropouts and measurement errors. The official software releases below are fully supported and tested on genuine NanoRFE hardware. See the official store and look for V2 Plus4/VNA6000 series only to ensure full software compatibility.
NanoVNA USB Drivers
The NanoVNA series uses a standard USB-CDC (Communications Device Class) interface. Most modern operating systems handle this automatically, but older versions of Windows may require a manual driver installation.
- Windows 11 & Windows 10: Drivers are installed automatically via Windows Update. Plug and play.
- Windows 8 & Older: Download Cypress USB-CDC Driver.
- MacOS / Linux: No drivers required. Ensure your user account has permissions to access serial (ACM) devices.
NanoVNA-QT (Official Native Software)
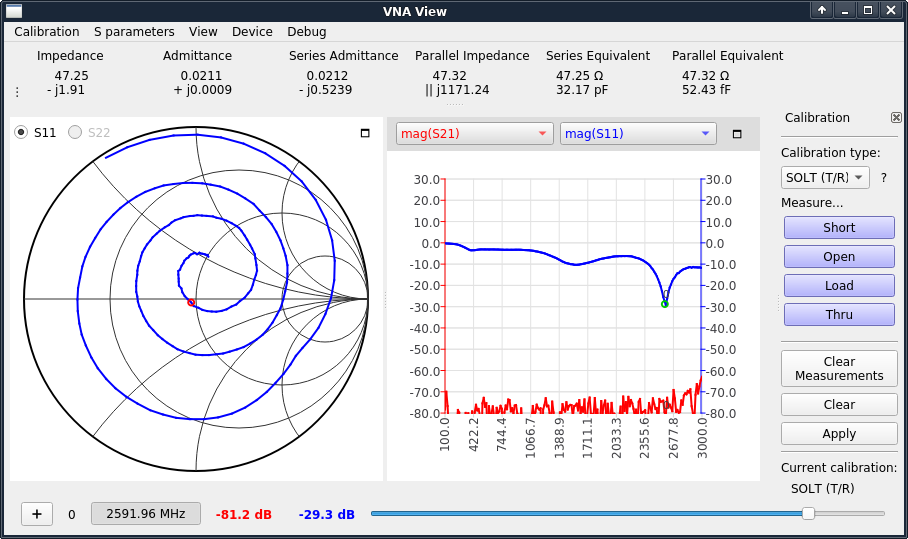
NanoVNA-QT (VNA View) is the official, native desktop application developed by NanoRFE. Unlike Python-based alternatives, it is written in C++ using the high-performance Qt framework, allowing it to communicate directly with the hardware's native protocol.
Key features:- High speed realtime sweep: Optimized for the lowest possible latency between the hardware and the display, essential for "live" tuning of duplexers and filters.
- Comprehensive parameter displays: View S11 (Reflection) and S21 (Transmission) simultaneously. Supports LogMag, Phase, Smith Charts, Polar plots, and VSWR.
- Calibration: Supports 1-port and 2-port calibration (Short, Open, Load, Thru) and custom calibration kit parameters, with the ability to save and load calibration states directly to your PC.
- Data export: Export your measurement data to Touchstone (.s1p, .s2p) files for use in professional simulation software like ADS or AWR Microwave Office, or in CSV format.
Download NanoVNA-QT v1.1 (Latest)
NanoVNA Saver (Advanced Multiplatform Tool)
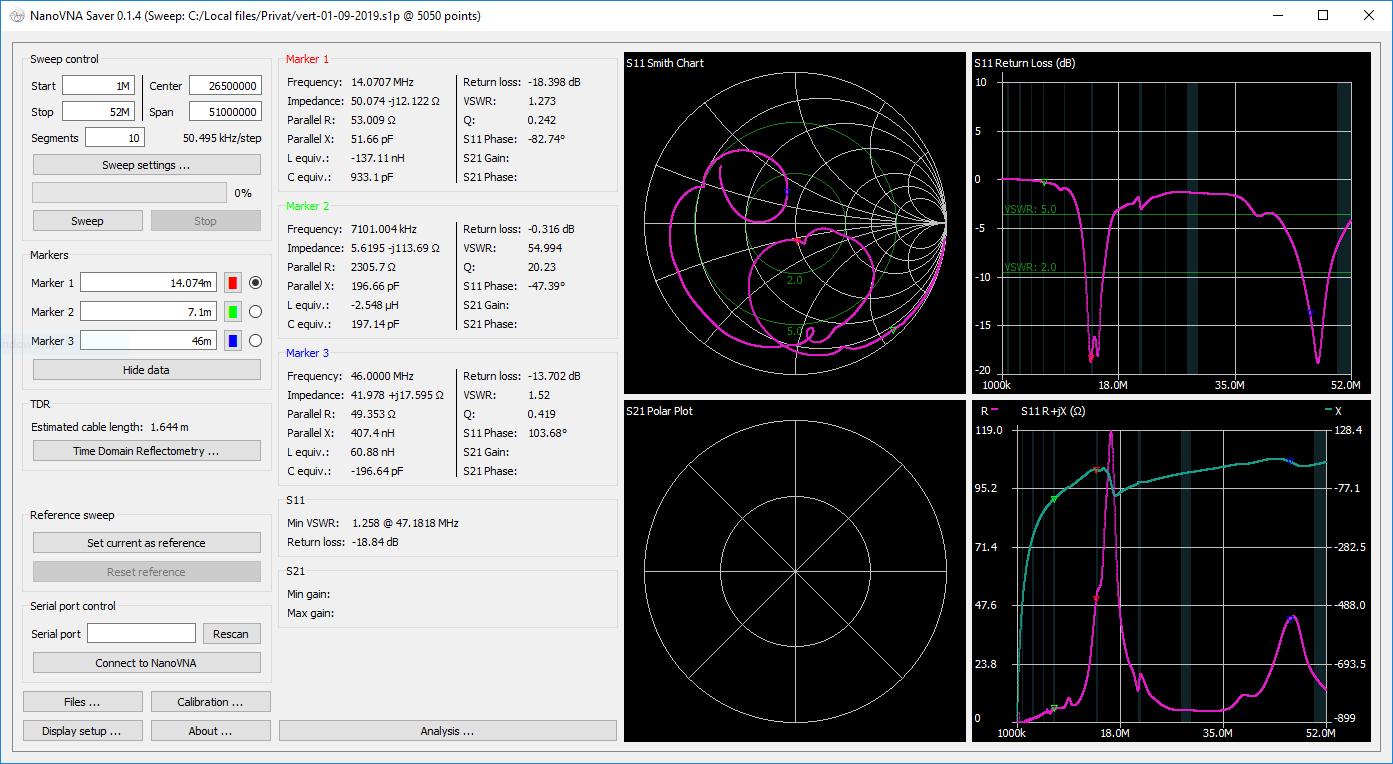
NanoVNA Saver is a multiplatform tool for the NanoVNA created by Rune B. Broberg. Its defining feature is the ability to bypass the standard hardware display limits. By automatically splitting large frequency spans into multiple smaller segments and stitching them together, it allows for seamless, ultra-high-resolution analytical sweeps (up to >10k points).
Key features:- Multiple chart types: Display Smith charts, LogMag, Phase, and VSWR charts simultaneously for both S11 and S21 parameters.
- Advanced markers: View impedance, VSWR, Q-factor, and equivalent capacitance/inductance at any marker location.
- TDR & cable measurement: Built-in Time Domain Reflectometry (TDR) function for precise cable length measurement and fault finding.
- Reference bands: Overlay customizable frequency bands, such as amateur radio bands, directly onto your sweeps.
- In-app calibration: Perform calibration directly through the software, including compensation for non-ideal standards.
- Data export: Save and import 1-port and 2-port Touchstone files (.s1p, .s2p) or export chart images for documentation.
Download NanoVNA Saver v0.6.2 (Latest)
Other/Legacy NanoVNA software
Note: The tools listed below are primarily designed for legacy V1 (NanoVNA-H/H4) architectures. They are not recommended for the V2 or VNA6000 series, as they do not support the new communication protocol features that enable higher sweep speeds of modern NanoVNA hardware.
NanoVNA-App
A Windows-specific client developed by OneOfEleven. While popular for V1 units due to its simple interface, it is considered legacy software and lacks support for the high-speed data transfer modes found in newer hardware.
View GitHub Repository »NanoVNA Web Client
A browser-based tool using the WebSerial API. It allows for basic V1 connectivity on Chrome/Edge without installation. It is obsolete for professional use as it offers limited features compared to NanoVNA-QT.
View GitHub Repository »Troubleshooting connection issues
If your PC software does not recognize your NanoVNA hardware:
- Check the Cable: Many standard USB cables (especially those that come with cheap electronics) are "Power Only." Ensure you are using a high-quality Data Cable capable of full USB data transfer.
- COM Port Access: On Windows, if you get an error connecting, go to Device > Other in the software and manually enter
\\.\COMx(where x is your device's COM port number, which can be found in Windows Device Manager). - Firmware Version: Update your NanoVNA to the latest firmware to guarantee complete protocol compatibility with the newest software versions.